This chapter contains the following topics:
Introduction to Defining Multiple Companies
Automated Multiple Company Setup
The Passport Business Solutions software can perform data processing for multiple companies (over a thousand of them). The only practical limit on the number of companies is the amount of disk space available. This chapter describes how to set up the software to accommodate multiple companies.
Upon initial installation, The Passport Business Solutions software supports a single company, and this by default is Company 00.
|
Note |
Thin Client If you have Thin Client on your system you must get everyone out of PBS and stop the Thin Client service before you add a company. When the add company procedure is completed you must restart the service. |
|
Note |
If you are converting data from an earlier version of PBS, RealWorld or RW32, running the EZ Convert utility will re-create the companies and modules that existed in the older version. There is no need to create them using these steps. |
Once you have added your first additional company, a company selection field (screen in character) is available whenever you start up your Passport Business Solutions software. PBS uses a Multi-Company file/table to contain the list of companies; it is the presence of this data which triggers the company selection screen.
On an SQL system Company 00 is created in the multi-company table during the install.
On a Vision system, after adding your first additional company, you must explicitly enter Company 00 into the Multi-Company file. As long as 00 was merely a default, this file did not even exist; but once 00 becomes one company among many it needs its own name and its own entry in the file. You do this on the CTL menu using the Define multiple companies selection.
The automatic procedure is far easier than the manual one, requiring only that you run the automatic installation utility. When running PBS on an SQL system you should use the automated installation.
For switching companies and printing a list of companies, see the Switching Between Companies chapter of the System documentation.
The steps will differ if you have SQL or a Vision install. If you are adding a company to a Vision install, skip to Automated Add, otherwise continue with the next section.
With SQL you have additional steps to run:
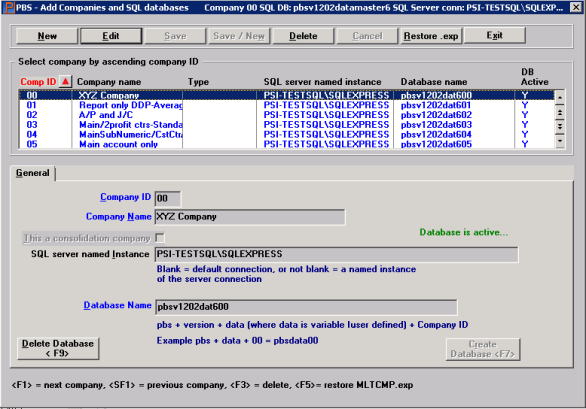
| 1. | Run MC.BAT. This is found in the top-level PBS. This screen displays: |

| 2. | Select the New button. |
| 3. | Enter the Company ID, Company Name and Select the Save button. It will indicate Y in the DB Active column. |
| 4. | Continue with the next section to add the tables. |
To begin the automated procedure in Vision or continue in SQL, do the following:
|
Step |
Description |
|
1 |
If this is a Vision system and your first multiple company, add 00 to the Multi-Company File to define your current company as Company 00 by using the instructions in the Manual Multiple Company Set Up. Once you define Company 00, return to this section and continue to the next step.
Company 00 is automatically installed on an SQL system. |
|
2 |
Before adding any more companies, back up the contents of your PBS top-level Folder (directory). If a system crash, power failure, or other hardware problem occurs during the following procedure, copy the backup to this directory and restart the procedure. If this is an SQL system, then you must also backup the database. |
|
3 |
Verify that everyone is out of PBS before starting the Add Company program. |
|
4 |
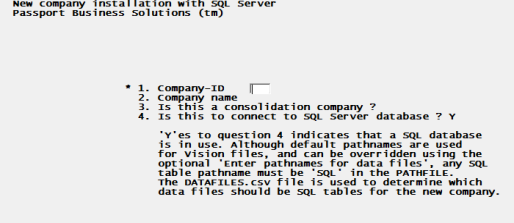
For Windows Start->Programs->PBS->General Utilities->Add Company You may also select the ADDCMP.BAT in top-level PBS. For UNIX From the PBS top-level directory system prompt, type: The following screen displays: |
|
Note |
Company 00 must exist before you attempt to run the automated Add Company utility. The structure for company 00 is used as a template to add a company. |
Enter information into the New company installation screen as follows:
*1. Company ID
Enter the Company-ID you wish to add.
|
Format |
Two characters, consisting only of digits or letters. Spaces are not allowed. Lowercase if valid but is converted to uppercase. |
|
Example |
Type XC |
2. Company name
Enter the name of the company. This field is required. The name entered here is not used on reports or forms printing. It is only used when selecting or switching companies. To reduce confusion, you should use the same name that you intend to enter in Company information.
The Company name can be edited later.
|
Format |
Up to 30 characters. |
|
Example |
Type XYZ Company |
3. Is this a consolidation company ?
A consolidation company is used to contain business transactions from other companies. It is described in the chapter of that name in the General Ledger user manual. Answer Y to designate the company being defined as a consolidation company. Answer N if you don't want it to be a consolidation company.
|
Format |
One letter, either Y or N there is no default |
|
Example |
Type N and then press <Enter> |
4. Is this to connect to the SQL server database ?
This question defaults to Y if it is an SQL system. If not, then it defaults to N.
|
Format |
One letter, either Y or N there is no default |
|
Example |
There is nothing to type because the field is defaulted and cannot be changed |
Field number to change ?
Make any desired changes, and press <Enter>.
The New company installation screen shown below displays:
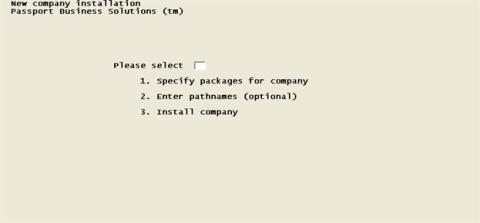
From the New company installation screen described above, you can link specific PBS packages to the newly defined company so only those selected packages load when starting PBS.
To specify a package, do the following:
| 1. | Enter 1 to select Specify packages for company. The following screen displays: |
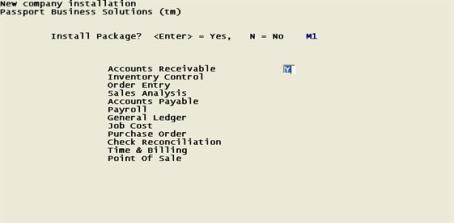
| 2. | All PBS packages display on the menu. For each package installed on your computer answer Y to install the package for the added company. Change the default answer to N for those packages you are not installing for the added company. For those packages which are not installed on the system or not installed for a new company, (Not installed) will display next to the package name. |
| 3. | When you are finished, enter N at the Any change ? prompt. |
Defined pathnames point PBS programs to the hard disk or network location of their corresponding program files and data files. Only a few programs and data files are located in the top-level PBS directory. Dozens of files, however, are located in sub-directories.
To see how path names are presently set up, run the Pathfinder program as described in the Using Pathfinder chapter. Use the Assign pathnames function to see the names of the directories where your programs and data files are located.
To enter a new path name for PBS program files or data files for the added company (from the New company installation screen), do the following:
Enter 2 to select Enter path names (optional) to enter customized path names. You may skip this optional section. Defined pathnames point PBS programs to the hard disk or network location of their corresponding program files and data files. Only a few programs and data files are located in the top-level PBS directory. Dozens of files, however, are located in subdirectories.
To see how path names are presently set up, run the Pathfinder program as described in the Assigning path names section of the Using Pathfinder chapter. Use the Assign pathnames function to see the names of the directories where your programs and data files are located.
The following screen displays:
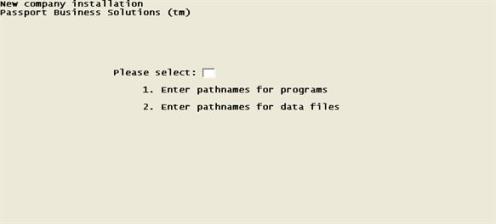
You can make entries in one or both of these selections by doing the following:
| 1. | Enter 1 to select Enter pathnames for programs and the following screen displays: |
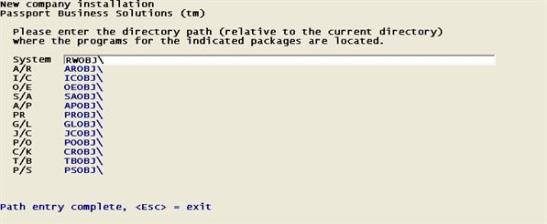
On a UNIX system the pathnames are entered with a forward slash (/). On Windows systems the pathnames are entered with a backslash (\).
Notice that default pathnames display for each company you selected using Specify packages for company from the New company installation menu. For packages that are installed on your computer but not chosen with Specify packages for company, (Not selected) will display next to the package name. Packages that are not installed on your computer show (Not installed).
| 2. | Enter an appropriate directory path names for each package. Remember not to use any special characters such as period (.), comma (,) or less than (<) in the path. |
| 3. | When you are satisfied with the program pathnames, press <Esc>. If you are already at the Any change? prompt, press <Enter>. |
Refer to the Using Pathfinder chapter for more information on pathnames and file locations.
| 4. | Continue on to the next section to enter data file pathnames. |
If this is an SQL system, do NOT change the paths to the tables.
| 1. | Enter 2 from the previous menu to select Enter pathnames for data files. The following screen displays: |
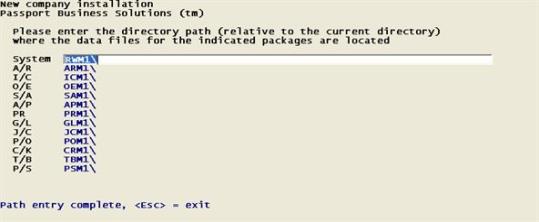
| 2. | Enter data file pathnames in the same manner as you entered program pathnames above. However, pathnames entered here point to the data files for the added company. |
| 3. | When you are satisfied with data file pathnames, press <Esc>. If you are already at the Any change ? prompt, then press <Enter>. |
Select Install company from the New company installation options menu, to create new files for any new company you are creating according to the following guidelines:
| • | Programs for the company are identified by the same directory pathnames as used for Company 00. These are normally in directories such as AROBJ (for Accounts Receivable) and RWOBJ (for PBS system-wide programs). This is the most efficient way to identify program pathnames for additional companies. |
| • | Data files for the company are identified by the same directory pathnames as used for Company 00, with the 00 replaced by the Company-ID that you entered earlier. For example, the A/R data files for Company 00 are in a subdirectory named AR00. |
The A/R data files for the new company (for example, VM) are placed in a directory ARVM.
The following steps are required:
| 1. | Select Install company from the second New company installation screen. The following screen displays: |
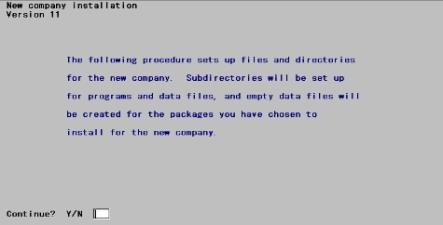
| 2. | No new directories or files have been created yet on your hard disk. To end the new company installation process and make no changes to the data on your system, answer N or press <Esc> at every screen until you return to the command prompt. |
| 3. | To Continue with the new company installation process, answer Y at the Continue? prompt. The installation of new companies begins with files being created and changes made to your system. The following screen displays: |
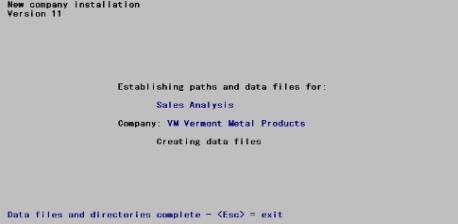
| 4. | The arrow indicator changes direction as the program either reads or writes the path information. After paths are set up for the company, data files are created according to the data file pathnames entered. As each table or file is being created, a message displays for each like this: |

| 5. | When all processing is complete, you will see a Data files and directories complete - <Esc> = Exit message. Press <Esc> at this message. You may now install another company, or press <Esc> to complete the procedure. Once you press <Esc> at the Company-ID field, a screen showing the update files process displays. This screen will indicate that the SQMENU.DAT and the SQPATH.DAT are being updated. This may take several minutes. When completed the screen will close. |
| 6. | Once the new company updating process ends, you can enter data into PBS for packages for all newly created companies. |
| 7. | Before entering data, you may use Pathfinder to modify the layout of your hard disk if the default layout specified by the automated process does not accommodate the company you have defined. To do this, refer to the Using Pathfinder chapter. |
You must first run addcmp to add the accounting modules before you add the manufacturing modules. See the Automated Multiple Company Setup section above.
All the programs and files for all the manufacturing modules are added. However, your license determines which modules you will be able to use.
From the PBS top-level directory system prompt, select the ADDMFG batch (or addmfg script for UNIX/Linux).
Enter your user ID and password. This screen displays:
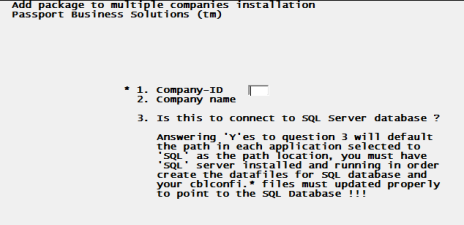
The steps are similar to adding accounting and distribution modules:
| 1. | Select a company ID. This must already exist. |
| 2. | You will be asked "Is this to connect to SQL Server database ?" If it is, then enter Y, otherwise enter N. You must be licensed for SQL in order to access and generate SQL tables. |
| 3. | Specify packages for the company (there is only 1 to select and that is manufacturing). All the manufacturing modules for which you are licensed are added. |
| 4. | Enter path names. You may change the default paths to the manufacturing files and programs. This step is optional. If you do not, then the defaults will be used. The defaults are recommended. When it is an SQL system, the defaults should NOT be changed. |
| 5. | Install the company. This creates the files and paths. |
This concludes adding the manufacturing modules to your company.
You may elect to add multi-company capabilities manually. It is highly recommended that you run the Automated Multiple Company Setup functions on an SQL installation.
With a Vision install, follow these instructions:
Select
Define multiple companies from the CTL menu.
The above selection is only accessible on a standard vision file system. If you are using SQL, then you must use the batch mc.bat.
The following screen displays:
Graphical Mode
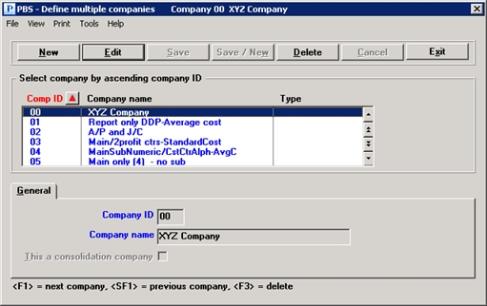
Manual Multiple Company List Box
The list box displays up to 6 companies at a time. You may sort the companies by company ID in ascending or descending order. Click on the column name or the arrow to the right of the column name to change the sort or use the View options. Only column names in red may be sorted.
To locate a user start typing the company ID or use the arrow keys, <PgDn>/<PgUp>, and <Home>/<End> keys to find the order. The <F1> and <SF1> work the same as the arrow keys.
When a company is found, to edit the record you may select <Enter>.
Manual Multiple Company Buttons
To access the buttons you may click on them with the mouse or use the Tab key for access. When the focus is on a key use the <Enter> key to select it. Keyboard equivalents are also available:
| Button | Keyboard | Description |
|
New |
Ctrl+n |
To enter a new company |
|
Edit |
Ctrl+e |
To edit an existing company |
|
Save |
Ctrl+s |
To save a new company or changes to an existing company |
|
Save/New |
Ctrl+w |
This is a combination of the Save and New buttons |
|
Delete |
Ctrl+d |
To delete an existing company. You may also use the <F3> key |
|
Cancel |
Ctrl+c |
To cancel the addition of a user or editing a company |
|
Exit |
Ctrl+x |
To exit to the menu. You may also use the <Esc> button |
Character Mode
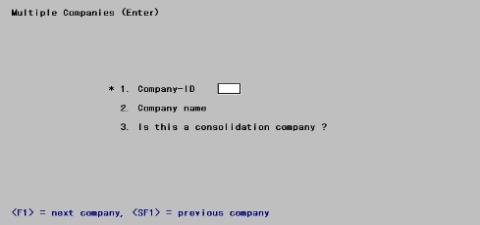
From this screen you can work with both new and existing entries. Enter the following information:
Enter the Company-ID you wish to add or change.
|
Format |
Two characters, consisting only of digits or letters. Spaces are not allowed. Lowercase if valid but is converted to uppercase. |
Options
In character mode you may also use the options described below:
|
<F1> |
For the next company on file |
|
<SF1> |
For the previous company on file |
|
<F3> |
After selecting a company, you may delete it. |
Enter the name of the company. This field is required.
|
Format |
Up to 30 characters maximum. |
A consolidation company is used to contain business transactions from other companies. It is described in the chapter of that name in the General Ledger user manual. Check this box, (answer Y) to designate the company being defined as a consolidation company. Leave it unchecked (answer N) if you don’t want it to be a consolidation company.
|
Format |
Graphical: Check box where checked is yes and unchecked is no. The default is unchecked Character: One letter, either Y or N the default is N |
Make any desired changes. In graphical mode select Save to complete processing this company. In character mode press <Enter> to complete processing this company.
Options
For an existing entry, you may also use one of the options:
|
<F1> |
For the next company on file |
|
<SF1> |
For the previous company on file |
|
<F3> |
To delete this company. |
Deleting a company would normally be done only to recover from a previous erroneous entry or to get rid of a consolidation company after producing the desired consolidation reports. The only effect is to remove the company from the Multi-company file. A check is made as to the existence of a company file. If there, then deletion is not allowed. No other check is made that the company’s existing directories, data files, or Pathfinder entries have previously been deleted. If a valid company is deleted in error, it can simply be re-entered with no loss of data.
Formats are available for A/P Checks, A/R Invoices, A/R Statements, O/E Forms, Purchase Order Forms and PR Forms.
You can either export forms from one of your companies, rename the file and restore it into the new company or you can start with the ‘standard’ formats that were provided during the installation of PBS and restore one or more of those files.
Export the forms using the accounting modules' file utilities.
Copy the files into the format expected by the file utilities.
For example, for company 01 for OE, copy the OE forms file from 00 to 01 by typing the following command from the command prompt in the PBS top-level folder:
Copy OEFRMF00.EXP OEFRMF01.EXP
After the file(s) have been copied, they may be imported (Restore from an export file) into the selected company using the accounting modules' file utilities.
The exports of forms files are in zip files for windows and .tar files for Linux.
A standard set of export forms files are in the file named PBSformats-new.zip or PBS formats-new.tar.
Only the Payroll forms are in PRFORMS.zip or PRFORMS.tar. Only the Accounts Payable forms are in APFORMS.zip and apforms.tar.
There are forms for the manufacturing Customer orders in COFRMF00.zip.
The forms used with RW32 are in PBSformats.zip or PBS formats.tar. The older RWC forms for Version 8/9 are in rwcforms.zip and rwcforms.tar.
Export and restore the forms that you need. If you are not sure, try out the export from each file.
First, unzip (untar) the appropriate files in the PBS top-level folder.
These export files can be renamed and used for installing the forms for companies other than 00. Substitute the 00 part of the file name with the actual Company ID.
The following export files will be created during extraction:
| Module | Export File |
|---|---|
|
A/P |
APFRMF00.EXP |
|
A/R - Statements |
PTBFMT00.EXP |
|
A/R - Invoices |
lVCFMT00.EXP |
|
C/O - Invoices |
COFRMF00.EXP |
|
O/E |
OEFRMF00.EXP |
|
P/O |
POFRMF00.EXP |
|
PR |
PRFRMF00.EXP |
These files may be used to install or to re-install default forms using the appropriate accounting module's file utilities.
To use the files for companies other than Company 00, copy the files into the format expected by the file utilities.
For example, for company 01 for OE, copy the OE forms file from 00 to 01 by typing the following command from the command prompt in the PBS top-level folder:
Copy OEFRMF00.EXP OEFRMF01.EXP
After the file(s) have been copied, they may be imported (Restore from an export file) into the selected company using the modules' file utilities.